
Showing posts with label money. Show all posts

Friday, July 26, 2013

A Place for Baby to Sleep.


In about 12 years, girls everywhere will be swooning over Prince George, the way my generation swooned over Prince William. Sure his hair line has receded quite a bit, but he's still a rather hansom chap if you ask me. Prince Harry of course has become the better looking one over time, but I remember my days of dreaming to be in the place where Kate is now. I bet their nursery looks beautiful with pieces picked out from all kinds of exotic places.
Though picking out nursery furniture has been described to me as being stressful. And I don't doubt it, I mean all those things are expensive and can really add up. I searched through some stores to see how much it would cost to set up a nursery and here I have provided one example of a lesser expensive store (Ikea) and a more average to expensive store (Sears)
If I go to Ikea and pick out average priced items, plus a can of paint, the average cost of a nursery would be roughly $800-$900.
If I went to Sears and picked out the same average priced items it would cost around $1500
Of course I'm not saying that everyone spends this amount of money on a nursery, but if you were to purchase all your basics brand new, these are roughly the costs.
 This includes the following items:
  • crib
  • mattress
  • sheets
  • bumper pad
  • change table
  • mobile
  • curtains
  • glider/chair
  • dresser
  • change pad
  • diaper pail
  • rug
  • some decor items such as pictures
I think we can agree that these items are the basics a parent would put in a nursery. I have put all those items in my nursery but I have thrifted/refurbished as much as I can ( though there were a one or two items that I bought brand new):
  • crib- free
  • mattress - $70
  • sheets- $10
  • bumper pad- $10- second hand
  • change table- $50 and mine doubles as a dresser
  • mobile-not there yet, plan to make one out of an embroidery hoop and some left over fabrics.
  • curtains- $6
  • glider/chair- $50 on reupholstering 
  • dresser...included in change table cost
  • can of paint- $18
  • change pad- $5
  • rug- $25
  • diaper pail- $8
  • decor- $7
Total: $261

And here is what I ended up with:
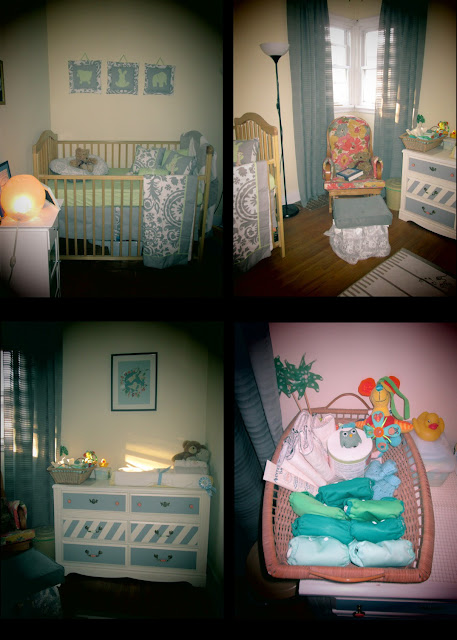

Let me tell you a bit about what is in each picture starting with the top left (yes I did just look at my hands to contemplate my lefts and rights)
Top Left:
The crib was free. A friend at work no longer required it, and gave it to me. Often you can find free cribs on Kijiji also. The bedding was a gift too, a very beautiful gift. I originally made my own bedding. The chevron quilt which hangs on the back of the crib and the dust ruffle which is now a ruffle on the bottom of my glider stool. The feeding pillow was purchased second hand and I sewed a new cover for it.
Top Right:
Curtains: I bought the fabric for these curtains at the Fabricland on Upper Ottawa st in Hamilton. The top floor is full of discount fabric, and I always tell people to get their fabrics there. I paid $3 per metre for that fabric and the hoops I had laying around the house ( they were a Value Village purchase from a while ago...I knew they would come in handy!)
The glider: This chair was left in my house when we purchased it just over a year ago. I thought it was an ugly chair. However, I made use of it by reupholstering it with a bright fabric to add a bright pop of colour to my nursery. The fabric once again, from Fabricland on Upper Ottawa, and cushioning which was the more expensive part, from the same street, different store. I feel like I could have done it cheaper with different cushioning, and so this project cost me $50 plus $6 for the stool, after reupholstering cost,  which still isn't terrible considering a new glider and stool would cost around $200
Bottom left:
The dresser/change table: This is by far my favourite nursery transformation. I purchased the dresser for $40 at Value Village, more than I would normally pay for a furniture item, but I saw great potential in it and I knew it wouldn't be a toss out item after the baby grows. It used to be bright white with a honey stained top and ( I don't know if you can see it) a decorative strip of wood between the top and middle drawers also stained in a golden honey colour.  While purchasing this item, another customer also interested in the item suggested that I should leave the honey coloured as is, and then paint the rest black with an antiquing /whitish crackle...Of course I smiled and said that I would consider it, but seriously... that would look terrible, it's a good thing I purchased the item and not him, I just saved it from time travel to 1995!
I ended up painting the entire thing to an antique white and got rid of that horrid honey colour, and then added some grey stripes and a touch of colour to the knobs. I wouldn't have done it this way if it wasn't going in a nursery, But personally I think this is more nursery appropriate than honey and black.

Bottom right:
The basket on top of the dresser, which holds my diapering stash, is a diaper basket that has been passed down and used by multiple generations in my family. 
As for the diapers: ( I think I already covered a lot of this in a previous post, but here is a quick summary)
The average cost  (according to this blog)to start up is about $450. (not including laundry costs). 

How I did it:
7 flip style covers: (some were on sale)  $80
2 king sized 100% cotton bed sheets from my local thrift store cut up and sewn into 44 inserts -$10 
5 6-pack stay dry liners, I sewed mine directly onto the inserts  $30
total: $120

add on the costs for my home made newborn diaper covers (I made 7): ~ $50
new total $170

I know it probably doesn't compare to Little Prince Georges new room, but I absolutely LOVE my nursery. I think that if I had bought the big pieces brand new, it wouldn't feel the same, and wouldn't match anything in my house or my lifestyle. If I could change anything about it, I would paint the glider and the crib both antique white to match the dresser, but I simply don't feel like it, not at 9  months pregnant.


Edit/addition:

I got around to making the mobiles! Hoorah! I used a cardboard loop for one, and an embroidery  hoop for the other, some ribbon I had laying around, scrap fabric and buttons. I hung one mobile over the crib and the other over the change table.


Thursday, May 9, 2013

Little Diapers for Little Bums

***** please take note of edit at bottom *****


Okay so this one was a big project. I plan on cloth diapering. It saves a tonne of money plus you are doing the environment a huge favour. I planned on making a pocket all-in-one diaper (AIO), meaning that there is a space between the fleecy layer and the waterproof layer into which you insert a soaker pad and closing the front using Snappi's . I had everything ready to go including a trial run made completely out of  cheap jersey I had laying around ( which I even tested on my niece!) and was about to purchase the fabrics and other supplies on line (totaling about $120) when a light bulb suddenly went off and I realized that Snappi's can never attach to PUL fabric. So I scrapped the whole project and started over. 
A friend of mine showed me the diapers she was using on her 3 month old little boy, and I loved the ease of them, and the look. They are called a Flip diaper. All it is, is a waterproof cover that can be re-sized to fit a baby from birth to potty training. You simply lay an insert inside it and snap the thing onto your baby. It doesn't bunch up like regular cloth diaper which I always thought looked really bulky on babies, but rather sits nice and snug. And the best part: it's super cheap, especially if you make your own inserts like I did. You only need about 7 covers and then a whole bunch of inserts. In total I have spent just about $150 on diapers (including this current project)...this will last me several years.

(This next bit is not based on my experience, but the experience of friends)
Three “issues” with cloth diapers and newborns:

  1. Now a flip diaper, is fantastic, but in the beginning, at least for the first couple days (about 5 give or take a day) babies have this really gross tar like poops which will destroy your cloth diaper, so it's best to use either disposable diapers for the first week or disposable liners for inside your cloth diaper.
  1. Another problem with cloth diapers and newborns is that the cloth diaper, even when placed into the smallest size settings, may be too big for your little one.
  1. And last but not least, that little umbilical cord that is still attached to your baby's soon to be belly button. It needs room, and your typical cloth diaper is probably going to cover it. (unless of course you have specifically purchased newborn cloth diapers.)

My plan to resolve the new-born-might-not-fit-into-my-already-purchased-diapers situation: make my own cloth diapers for newborns.
I based my diaper cover from a blog I read by “Sweet 'n' Sassy Girls” who created a tutorial on how to make your own flip style diaper cover. I used her tutorial as a guide for my own so I give her/them some credit for guiding me.

Here is how I did it:

  1. Visit www.fabric.com and purchase some on sale PUL (polyurethane laminate, basically it's fabric that has a waterproof layer on it to prevent leaks). I purchased this on line because it was much cheaper to do so than to purchase it in store. I did do some price comparisons: at fabric land, this material could be purchased for $33 per metre (roughly per yard for those south of the Canadian boarder) or online at just under $10 per metre. I purchased a yard each of three different colours (this left me with enough to also make wet bags for my diaper pail)
  2. Trace a new born size disposable diaper (the ones with the dip for the umbilical cord) onto a piece of cardboard to make a pattern and cut it out. (I find it easier to trace the cardboard onto the fabric after than to trace a paper).
    new born disposable with dip

    traced and cut out the pattern


  3. Your PUL fabric will have different textures on either side. One side will feel like plastic/rubber. I'm going to call it the plastic side in this blog. The other side will feel like polyester, to which I will refer to as the soft side. Just so that we can stay on the same page. What you want to do now is trace your cardboard pattern onto the plastic side of your fabric. You will want to trace the ends of your pattern twice (see pic) to create the pockets of the diaper. And then using anything with a straight edge create 2 strips about 3 cm (about 1 ½ inch) wide and a little shorter than your diaper is long. These will be for the leg elastics. 


  4. Cut out all your pieces.

  5. Focusing now on the 2 narrow strips. What you are going to do is iron down one of the edges on each one. This might be tricky to do without burning your fingers, but it is doable. Ironing it will make it easier to create a clean edge when sewing. Make sure you are ironing the correct side. By that I mean, you are ironing the plastic side onto the plastic side. The heat of the iron will cause the plastics to melt together to create a bond.


  6. Now the sewing begins: lets start with the front pocket. What you want to do first is line the main diaper piece up with the pocket flap. Make sure that the soft sides are together. I have set my stitch setting to the large zig-zag. This is my personal preference for the edge, I find it easier to make sure everything gets connected properly but you can use a straight stitch if you want. Don't start at the very beginning of the flap, as you will need some room for the start of the leg elastics. Now zig-zag stitch carefully (no need to rush unless you are in labour) from one end to the other. Repeat this step for the back pocket and remember to place the soft sides together.
    line the edges up. SOFT SIDES TOGETHER!

    large zig-zag stitch

    This is where I begin stitching rather than at the start of the material

  7. Next you'll want to cut some elastics for the legs and the back. The two leg elastics should be about 10 cm (or 4”) and the back elastic about 6 cm (~3”) you want to tack the ends in place to your diaper. Attach them to the plastic side of the main diaper piece right about where it curves into the flaps. I attach them using a small zig-zag stitch going backwards and forwards a couple times until they are secure. Remember you are not sewing the entire length of the elastic, but just tacking the ends in place.
    for the legs

    for the back

  8. Attach the back elastic in the same way. I tacked the back elastic at almost the distance as the leg elastics if that makes any sense. Hopefully you can see/tell by the pic what I mean.
    small zig-zag for elastics

    leg elastics tacked on

    back elastic tacked on

  9. Now for attaching the leg bands (the pieces you ironed). Lay your diaper so that the plastic side is facing up. Set your sewing machine to the straight stitch setting. You want to first sew the non ironed edge plastic side down to the leg curve of the diaper starting just above the spot you tacked the elastic. And sew it up until the other tacked end, maybe a tiny bit past. (Make sure the elastic stays out of the way, you don't want to sew that down). Do this for both leg bands. You might have extra length once you reach the end, just cut that off.
    Stitching down the non-ironed edge to the leg curve.

    Does this pic help?  This is what you should have on both leg curves now

  10. This is a little bit difficult, but not impossible. The hard part about this is not sewing your elastic: Flip your diaper over. You now need to sew the other side of the leg band, the ironed side. (we ironed this because it is going to be on the outside of the diaper, and you want it to look neat). Still using the straight stitch, pull the band into place and stitch it down at the end. You can use the stitch marks from the other side as a guide to see where you need to sew. As you sew, you will need to stretch the elastic and make sure that is doesn't get sewn down. You are essentially creating a pocket or casing  around the elastic. Do this for the other leg band as well.
    Stitch down the ironed edge. I tried to line my  edge up with
    the the stitch line which you can see in this picture.  Make sure
    you don't sew the elastic!

    This is what you should end up with. 

  11. Now you need to go back to the pocket flaps and finish sewing those down at the elastics if they are still unsewn there.
    See how I didn't sew this part down at the beginning?
    sew it down now. it should slightly overlap the elastic  casing. if it overlaps
    a lot, cut some of it away.

  12. Flip the pockets so that the whole thing is now right side out. What we are going to do now is top stitch around the pockets to create a nice flat edge. Make sure to stretch the back elastic and bring the top stitch below this elastic to create a casing around it. We are not finished yet!
    Turned right side out. (Starting to look like a diaper!)

    Put your sewing machine on this setting. It ensures  that your stitch is nice and close to the edge.

    Top stitch the ouside edges. Don't forget to stretch and go below the back
    elastic to create a casing. 

    Like so.

  13. I use snaps to to close my diapers. You could use vlecro, but for this tutorial, I'm using snaps. I purchased my KAM snap plier set along with 100 white snaps from eBay for $20. Once again, had I purchased this entire set at a fabric store I would have paid around $85. Don't do that.


  14. First I will attach the 2 female snaps ( yes they are referred to as male and female, if you know your birds and the bees, you should be able to figure out which is which). These will attach to the back pocket. It's best to poke a hole first with the provided tool, because its difficult to force the snap through the PUL fabric
    Poke hole, place snap.

    squeeze them together.

    and there.....

    ...you go.

  15. Next we attach the front snaps, the male counter parts. I drew dots first so that I knew where to place each snap.


  16. I placed one set of snaps fro re-sizing purposes also, should my little one be too small to even fit this tiny diaper. To do this, we will only be attaching to one layer of the PUL fabric, so it is best to cut little squares from leftovers of the same fabric to create extra durability. The first row should be the male snaps, and the bottom should be the female snaps.
  17. Voila! Your diaper cover is complete! Now let me show you how I plan on stuffing it.


I made my own liners out of cotton bed sheets that I purchased at my local thrift store. These are about 4 layers thick, so I might either use 2 at a time or create an extra soaker pad out of old towels if needed. I also purchased a couple sets of stay dry fleece liners by Bum genius. This are intended to keep pee away from the baby's skin but still allow it to pass through to the soaker pads. Apparently they are great for night time. They were inexpensive, but you can also use velvet or fleece apparently.


Anyways clearly my liners are way to big for this tiny diaper, so we just fold it in half, and tuck each end into the pocket flaps and snap the buttons into place to their proper size, whatever that may be. I rolled the liner a bit at the legs to keep it tucked in and to prevent any possible leaks.

Here is my little diaper cover compared to my flip diaper cover.


I hope this detailed step by step tutorial will help others make their own cloth diapers. You can make regular sized diapers by tracing other sizes  of disposables, without the dip too. or you can use on of the many patterns you can find on line. The flip style so far is my favourite, even though our little one won't be trying them out until August. But I've seen them in use, and many people rave about them. 

The cost of my diapering system for this little one plus future babies: under $200 not including laundering costs (roughly an extra $150 per year), but if you wash at off peak hours and hang dry, it's not a whole lot. At least not compared to disposable diapers: roughly $1800 per child per year... that's a lot of money.  think of this way, lets say you have a child in 2012. this means he/she will be in diapers until 2015. You have baby 2 in 2014, in diapers until 2017, and baby 3 in 2016 in diapers until 2019. for each year each child is in diapers  you are paying roughly $1800.

Disposable diapers:
2012-2015... $1800 x3 = $5400                              
2014-2017...$1800 x 3=  $5400                                                                      
2016-2019...$1800 x3=   $5400                                                                      
                                      $16 200

I mean have I made a serious calculation mistake here??? 3 kids, each in diapers for three years.

Cloth diapering costs from 2012-2019 (7 years)
initial $200 + ($150 x 7 years of laundry costs)= $1250

lets be fair and add $200 per child for diaper repairs extra laundry costs and what not, so an extra $600 making it $1850 over the course of 7 years.

Which would you rather pay?


*****Edit:*****

September 17th 2013

My son is now just over 3 weeks old. These diapers worked okay for the first week or two. Then they seemed uncomfortable on him. Here are the problems I experieinced:
1. The inserts were too bulky, easy fix, I made some small ones out of old towels and some stay dry fabric.
2. The diaper was entirely too small. If you plan to make these, I suggest skipping out on the adjusting snaps and adding an extra 2 or so inches in the length,  or adding a lot more length ( maybe 4-5 more inches) if you want to keep the adjusting snaps.
3. The elastics were too tight. This is also an easy and obvious fix