Thursday, May 9, 2013

Little Diapers for Little Bums

***** please take note of edit at bottom *****


Okay so this one was a big project. I plan on cloth diapering. It saves a tonne of money plus you are doing the environment a huge favour. I planned on making a pocket all-in-one diaper (AIO), meaning that there is a space between the fleecy layer and the waterproof layer into which you insert a soaker pad and closing the front using Snappi's . I had everything ready to go including a trial run made completely out of  cheap jersey I had laying around ( which I even tested on my niece!) and was about to purchase the fabrics and other supplies on line (totaling about $120) when a light bulb suddenly went off and I realized that Snappi's can never attach to PUL fabric. So I scrapped the whole project and started over. 
A friend of mine showed me the diapers she was using on her 3 month old little boy, and I loved the ease of them, and the look. They are called a Flip diaper. All it is, is a waterproof cover that can be re-sized to fit a baby from birth to potty training. You simply lay an insert inside it and snap the thing onto your baby. It doesn't bunch up like regular cloth diaper which I always thought looked really bulky on babies, but rather sits nice and snug. And the best part: it's super cheap, especially if you make your own inserts like I did. You only need about 7 covers and then a whole bunch of inserts. In total I have spent just about $150 on diapers (including this current project)...this will last me several years.

(This next bit is not based on my experience, but the experience of friends)
Three “issues” with cloth diapers and newborns:

  1. Now a flip diaper, is fantastic, but in the beginning, at least for the first couple days (about 5 give or take a day) babies have this really gross tar like poops which will destroy your cloth diaper, so it's best to use either disposable diapers for the first week or disposable liners for inside your cloth diaper.
  1. Another problem with cloth diapers and newborns is that the cloth diaper, even when placed into the smallest size settings, may be too big for your little one.
  1. And last but not least, that little umbilical cord that is still attached to your baby's soon to be belly button. It needs room, and your typical cloth diaper is probably going to cover it. (unless of course you have specifically purchased newborn cloth diapers.)

My plan to resolve the new-born-might-not-fit-into-my-already-purchased-diapers situation: make my own cloth diapers for newborns.
I based my diaper cover from a blog I read by “Sweet 'n' Sassy Girls” who created a tutorial on how to make your own flip style diaper cover. I used her tutorial as a guide for my own so I give her/them some credit for guiding me.

Here is how I did it:

  1. Visit www.fabric.com and purchase some on sale PUL (polyurethane laminate, basically it's fabric that has a waterproof layer on it to prevent leaks). I purchased this on line because it was much cheaper to do so than to purchase it in store. I did do some price comparisons: at fabric land, this material could be purchased for $33 per metre (roughly per yard for those south of the Canadian boarder) or online at just under $10 per metre. I purchased a yard each of three different colours (this left me with enough to also make wet bags for my diaper pail)
  2. Trace a new born size disposable diaper (the ones with the dip for the umbilical cord) onto a piece of cardboard to make a pattern and cut it out. (I find it easier to trace the cardboard onto the fabric after than to trace a paper).
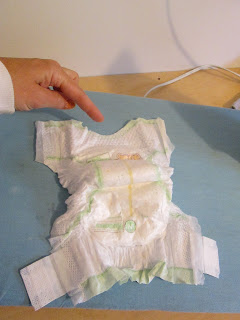
    new born disposable with dip

    traced and cut out the pattern


  3. Your PUL fabric will have different textures on either side. One side will feel like plastic/rubber. I'm going to call it the plastic side in this blog. The other side will feel like polyester, to which I will refer to as the soft side. Just so that we can stay on the same page. What you want to do now is trace your cardboard pattern onto the plastic side of your fabric. You will want to trace the ends of your pattern twice (see pic) to create the pockets of the diaper. And then using anything with a straight edge create 2 strips about 3 cm (about 1 ½ inch) wide and a little shorter than your diaper is long. These will be for the leg elastics. 


  4. Cut out all your pieces.

  5. Focusing now on the 2 narrow strips. What you are going to do is iron down one of the edges on each one. This might be tricky to do without burning your fingers, but it is doable. Ironing it will make it easier to create a clean edge when sewing. Make sure you are ironing the correct side. By that I mean, you are ironing the plastic side onto the plastic side. The heat of the iron will cause the plastics to melt together to create a bond.


  6. Now the sewing begins: lets start with the front pocket. What you want to do first is line the main diaper piece up with the pocket flap. Make sure that the soft sides are together. I have set my stitch setting to the large zig-zag. This is my personal preference for the edge, I find it easier to make sure everything gets connected properly but you can use a straight stitch if you want. Don't start at the very beginning of the flap, as you will need some room for the start of the leg elastics. Now zig-zag stitch carefully (no need to rush unless you are in labour) from one end to the other. Repeat this step for the back pocket and remember to place the soft sides together.
    line the edges up. SOFT SIDES TOGETHER!

    large zig-zag stitch

    This is where I begin stitching rather than at the start of the material

  7. Next you'll want to cut some elastics for the legs and the back. The two leg elastics should be about 10 cm (or 4”) and the back elastic about 6 cm (~3”) you want to tack the ends in place to your diaper. Attach them to the plastic side of the main diaper piece right about where it curves into the flaps. I attach them using a small zig-zag stitch going backwards and forwards a couple times until they are secure. Remember you are not sewing the entire length of the elastic, but just tacking the ends in place.
    for the legs

    for the back

  8. Attach the back elastic in the same way. I tacked the back elastic at almost the distance as the leg elastics if that makes any sense. Hopefully you can see/tell by the pic what I mean.
    small zig-zag for elastics

    leg elastics tacked on
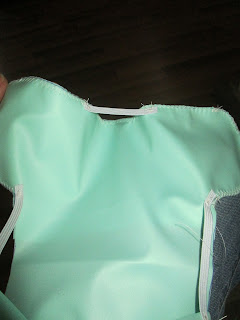
    back elastic tacked on

  9. Now for attaching the leg bands (the pieces you ironed). Lay your diaper so that the plastic side is facing up. Set your sewing machine to the straight stitch setting. You want to first sew the non ironed edge plastic side down to the leg curve of the diaper starting just above the spot you tacked the elastic. And sew it up until the other tacked end, maybe a tiny bit past. (Make sure the elastic stays out of the way, you don't want to sew that down). Do this for both leg bands. You might have extra length once you reach the end, just cut that off.
    Stitching down the non-ironed edge to the leg curve.

    Does this pic help?  This is what you should have on both leg curves now

  10. This is a little bit difficult, but not impossible. The hard part about this is not sewing your elastic: Flip your diaper over. You now need to sew the other side of the leg band, the ironed side. (we ironed this because it is going to be on the outside of the diaper, and you want it to look neat). Still using the straight stitch, pull the band into place and stitch it down at the end. You can use the stitch marks from the other side as a guide to see where you need to sew. As you sew, you will need to stretch the elastic and make sure that is doesn't get sewn down. You are essentially creating a pocket or casing  around the elastic. Do this for the other leg band as well.
    Stitch down the ironed edge. I tried to line my  edge up with
    the the stitch line which you can see in this picture.  Make sure
    you don't sew the elastic!

    This is what you should end up with. 

  11. Now you need to go back to the pocket flaps and finish sewing those down at the elastics if they are still unsewn there.
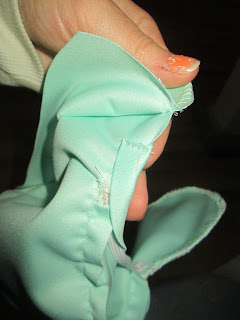
    See how I didn't sew this part down at the beginning?
    sew it down now. it should slightly overlap the elastic  casing. if it overlaps
    a lot, cut some of it away.

  12. Flip the pockets so that the whole thing is now right side out. What we are going to do now is top stitch around the pockets to create a nice flat edge. Make sure to stretch the back elastic and bring the top stitch below this elastic to create a casing around it. We are not finished yet!
    Turned right side out. (Starting to look like a diaper!)

    Put your sewing machine on this setting. It ensures  that your stitch is nice and close to the edge.

    Top stitch the ouside edges. Don't forget to stretch and go below the back
    elastic to create a casing. 

    Like so.

  13. I use snaps to to close my diapers. You could use vlecro, but for this tutorial, I'm using snaps. I purchased my KAM snap plier set along with 100 white snaps from eBay for $20. Once again, had I purchased this entire set at a fabric store I would have paid around $85. Don't do that.


  14. First I will attach the 2 female snaps ( yes they are referred to as male and female, if you know your birds and the bees, you should be able to figure out which is which). These will attach to the back pocket. It's best to poke a hole first with the provided tool, because its difficult to force the snap through the PUL fabric
    Poke hole, place snap.

    squeeze them together.

    and there.....

    ...you go.

  15. Next we attach the front snaps, the male counter parts. I drew dots first so that I knew where to place each snap.


  16. I placed one set of snaps fro re-sizing purposes also, should my little one be too small to even fit this tiny diaper. To do this, we will only be attaching to one layer of the PUL fabric, so it is best to cut little squares from leftovers of the same fabric to create extra durability. The first row should be the male snaps, and the bottom should be the female snaps.
  17. Voila! Your diaper cover is complete! Now let me show you how I plan on stuffing it.


I made my own liners out of cotton bed sheets that I purchased at my local thrift store. These are about 4 layers thick, so I might either use 2 at a time or create an extra soaker pad out of old towels if needed. I also purchased a couple sets of stay dry fleece liners by Bum genius. This are intended to keep pee away from the baby's skin but still allow it to pass through to the soaker pads. Apparently they are great for night time. They were inexpensive, but you can also use velvet or fleece apparently.


Anyways clearly my liners are way to big for this tiny diaper, so we just fold it in half, and tuck each end into the pocket flaps and snap the buttons into place to their proper size, whatever that may be. I rolled the liner a bit at the legs to keep it tucked in and to prevent any possible leaks.

Here is my little diaper cover compared to my flip diaper cover.


I hope this detailed step by step tutorial will help others make their own cloth diapers. You can make regular sized diapers by tracing other sizes  of disposables, without the dip too. or you can use on of the many patterns you can find on line. The flip style so far is my favourite, even though our little one won't be trying them out until August. But I've seen them in use, and many people rave about them. 

The cost of my diapering system for this little one plus future babies: under $200 not including laundering costs (roughly an extra $150 per year), but if you wash at off peak hours and hang dry, it's not a whole lot. At least not compared to disposable diapers: roughly $1800 per child per year... that's a lot of money.  think of this way, lets say you have a child in 2012. this means he/she will be in diapers until 2015. You have baby 2 in 2014, in diapers until 2017, and baby 3 in 2016 in diapers until 2019. for each year each child is in diapers  you are paying roughly $1800.

Disposable diapers:
2012-2015... $1800 x3 = $5400                              
2014-2017...$1800 x 3=  $5400                                                                      
2016-2019...$1800 x3=   $5400                                                                      
                                      $16 200

I mean have I made a serious calculation mistake here??? 3 kids, each in diapers for three years.

Cloth diapering costs from 2012-2019 (7 years)
initial $200 + ($150 x 7 years of laundry costs)= $1250

lets be fair and add $200 per child for diaper repairs extra laundry costs and what not, so an extra $600 making it $1850 over the course of 7 years.

Which would you rather pay?


*****Edit:*****

September 17th 2013

My son is now just over 3 weeks old. These diapers worked okay for the first week or two. Then they seemed uncomfortable on him. Here are the problems I experieinced:
1. The inserts were too bulky, easy fix, I made some small ones out of old towels and some stay dry fabric.
2. The diaper was entirely too small. If you plan to make these, I suggest skipping out on the adjusting snaps and adding an extra 2 or so inches in the length,  or adding a lot more length ( maybe 4-5 more inches) if you want to keep the adjusting snaps.
3. The elastics were too tight. This is also an easy and obvious fix


Wednesday, May 8, 2013

Overhaul


So there has been a lot, and I mean A LOT going on since my last post. I've been wanting to post for so long now, but I wanted to wait until the right moment to reveal all these new things. I have been working on some projects, but I couldn't blog about them without telling everyone my secret. Though I am sure that a lot of my readers also know me on Facebook and so this is old news to them. But this is what has been going on in my life:

About a year and a half ago, we decided that we wanted to start a family of our own. We wanted to keep it a secret from our families, especially since this would be the first grand child on my husbands side. The next year to come, were filled with monthly disappointments, tears and hundreds of peed on sticks and many temperature charts that always told me about my disappointments to come. At the end of the year, we were considered an infertile couple and the appointments with the specialist were set up. About one week before our appointment with the fertility specialist, I was looking over my latest temperature chart. Now on a normal chart, your temperature should be bi-phasal (an average temperature pre-ovulation and a higher average post-ovulation) but as I was looking at my chart, my temperature had gone up an extra jump to a tri-phasal when it should have started to fall. I just sat there and stared at my computer screen, knowing where my thoughts were going and knowing it would only lead to disappointment if I let my hopes get up like this. I had some other women look at my chart via a forum, and my thoughts were confirmed by another. Fritz told me it would be better to test that night (a Sunday) and be able to deal with my grief that night rather than in the morning, right before work when I'd have to face other people. So I opened yet another testing kit, like I have so many times before. Only this time.....I'm pregnant!
(from the mouth of a frugal mom-to-be: stop paying $15 per preggo test at Walmart and go to the dollar store. You pay $1.25 for the same strip in a cheaper package. Especially worth-while if you pee on ten of them per month.I just think it's a waste of money to spend $15 on something you pee on for 5 seconds,and then throw it out. The same goes for OPK's, buy those at the dollar store too)


How we revealed the news to our families:

We found out that we were pregnant on December 2nd and we wanted to wait until Christmas  to tell our families. A lot of people don't share the news with their families until 12 weeks but by Christmas I was 7 weeks, and should the worst happen, we would want our family's support. We wanted to tell our families in unique and creative ways so here's how things went down: We planned a family barbeque for the Sunday after church. We told them it was nothing special, but just to have lunch together. In the morning, before church, we stopped off at several A&W restaurants, and asked for the wrappers to the Grandpa, Grandma and Uncle burgers that their chain is so famous for. Unfortunately the Grandma burger got discontinued a month prior but after stopping at around 4 or 5 A&W's we finally managed to get a hold of a Grandma burger.
Eventually the family arrived at our place, we had the patties cooked and the toppings on the table, but the buns were placed inside the wrappers and stored on a plate in our cupboard. Once everyone was seated we told them that instead of barbequeing we just stopped at A&W and picked up burgers instead (though we did actually BBQ burgers ourselves) My father in law was the first to clue in and then Rudi, my youngest brother in law. Charl, my other brother in law simply stated "there's only a bun in this wrapper!" and didn't bother to look at the wrapper until it was pointed out  to him by Rudi. While all this commotion is going on, my mother in law, is just staring at her wrapper in utter confusion. and all I hear her say is quietly "prime rib?" (Prime rib is written in small print just above "Grandma burger" and then a couple seconds later, the loud scream of realization occurred!


My family was told in a different way. My parents already have three grand kids, so we couldn't do anything related to new grand parents. So instead, I made use of my nieces and nephew. Since they have no cousins yet, I picked up two little t-shirts, and a onesie, and created shirts that said "I'm going to be a big cousin" . I tucked these shirts nicely inside their actual gifts, in hopes that they would pull them out and reveal what's on them, but instead my three year old nephew just tossed it aside, without even giving unrolling it a thought. and my niece...well, she was in some sort of 2 year old mood. eventually my sister in law picked up one of the shirts. There wasn't as much screaming as with Fritz's family, but everyone was still very excited. My mother already knew (in fact she knew before I even knew!), even though I never told her and denied the fact that I knew she knew....mothers, they seem to know everything.
(my nephew is covering his, but it has dinos on it.)


The week before Christmas, I had my very first ultrasound at 6 weeks. I couldn't see a whole lot, just a little bean, but I did see a tiny blinking pixel, which was amazingly the heart beat, and for maybe 5 short seconds we heard it beating...at 6 weeks! it was incredible!
Then on March 22 we had our 2nd ultrasound this one would reveal the gender of the baby. The ultra sound was incredibly clear. We were able to count our baby's toes and fingers! they are all there!
Hans at  almost 22 weeks.


I am currently 26 weeks and we are expecting our little boy, Hans, to arrive August 11, 2013! Now we are not doing this the traditional North American style that is to say, seeing an OB, and having a hospital birth and most people would expect to do. We are planning (though I know things don't always go according to our plans) to have a non-medicated home birth. I watched a couple documentaries, one of which was "pregnant in America" about hospital vs home birth, and the women who did it both ways always said they wished the had all their kids at home rather than in the hospital. They mentioned an empowerment that comes from going  all natural, and that is what I want to experience. So I am taking that advice and I am starting right off the bat with a home birth with my first one. Plus this has always been normal in my family, to have your kids at home that is.The only reason you would go to a hospital is if something was medically wrong with you or the baby and lives are at risk. People in hospitals are sick or dying, I'm neither of those and so I don't feel the need to be there.  Statistics even show that it is just as safe/beneficial, if not safer/more beneficial to have your children at home in a familiar place where the mother has control over the process. Not that I am anti-hospital birth, or feel the need to defend my decision,  I just think this is the better way to go for my family. But should anything go wrong, midwives are equipped  just as much as your general hospital, and I can always be transferred there should I have to have a hospital birth at the last minute.

Pregnancy Brain
I didn't think this was a real thing. I thought most women just say this as an excuse.... but your mind really does seem to disintegrate around 4-5 months. Here's an example of what pregnancy has done to my brain: I was at IKEA the other day ( and by other day I mean more than a month ago) I saw an item I really liked for the nursery, it was a poster frame with a really cute picture of a quilted looking world with little children and animals and rocket ships. The colours work so well with our nursery. I get to the cash, and the cashier guy looks at the item, then looks at me and says " did you take our display item down?" turns out that I did, since the frame and poster don't get sold together and the display tags were hanging off the item. My mother didn't want to make a scene, because she knew what I did, even though I swore I didn't take the display item. It sure was a good thing we weren't shopping for couches!


So here is what I have been working on for the last while:
1. Our basement:
              The basement is starting to come to an end. All that is left is little projects related to the basement. That is, Fritz is working on building a pub, the frame of which is up, I am working on getting a proper crafting desk put in and I have a couple of paint touch ups to do plus some curtains for the windows and then this should be totally complete. It's amazing how much space a finished basement adds to a house!

2. A new room
Now with a baby on the way, I am working on the nursery. This project is my baby...no pun intended. The details of this will have to go in another post because there are a lot of projects just inside one room! Also it's not complete yet (almost) and I don't want to blog about an incomplete project. But soon enough.

3. Diapers.
I plan on cloth diapering, it's much cheaper and it's doing the environment a huge favour. I will blog about my diapers in a separate post also because it's a big topic on it's own, but I have been working on them and I'd love to share my diaper adventure with you.

4. Gardens.
 I just finished putting a bunch of flower seeds in my flower beds, o none of those have sprouted as of yet. but a lot of my other plants are growing and blossoming!We have extended our vegetable garden  from about roughly 12 square metres to 20 square metres. We have planted a great variety of veggies, and accidentally grew pumpkins. You see, we used our own compost and we composted a pumpkin from Thanksgiving/halloween and now the seeds are in our veggie garden and they seem to be the first ones to sprout ( aside from our rhubarb). Does anyone want a pumpkin plant?


I also made a new wreath for the summer using twigs from my back yard and some leftover paint:


So from now on a lot of my posts will probably include the frugal ways of a new mom. But fear not, I will still continue to craft and refurbish and reupholster and do all sorts of money saving things. It's just that there is a new dynamic to my blog.

Tuesday, January 22, 2013

hacking a thrift

In the winter time I have a lot less energy and very little motivation. I'm sure many of you are the same. I think this is because the cold weather makes my blood freeze and thus causes me to just want to crawl under a duvet to keep warm. Today the temperature was -27 C. 
The cold weather also affects my desire to do craft work because I like doing my work outside, where I can be messy and in the warm sunshine. My brain is always ready to work on DIY projects, but my ice cold body says "naaah maybe when it warms up." However this week, I felt slightly motivated to work on a project.
I guess it also doesn't help that what will be my crafting space is currently still under construction, and sitting at the coffee table with my sewing machine is not as handy. 
I found this great piece in Value Village for a mere $8. It's missing two drawers, but when placed properly, who cares right?
Here's what I did: 


1. I did nothing here. I just wanted you to see the before. 

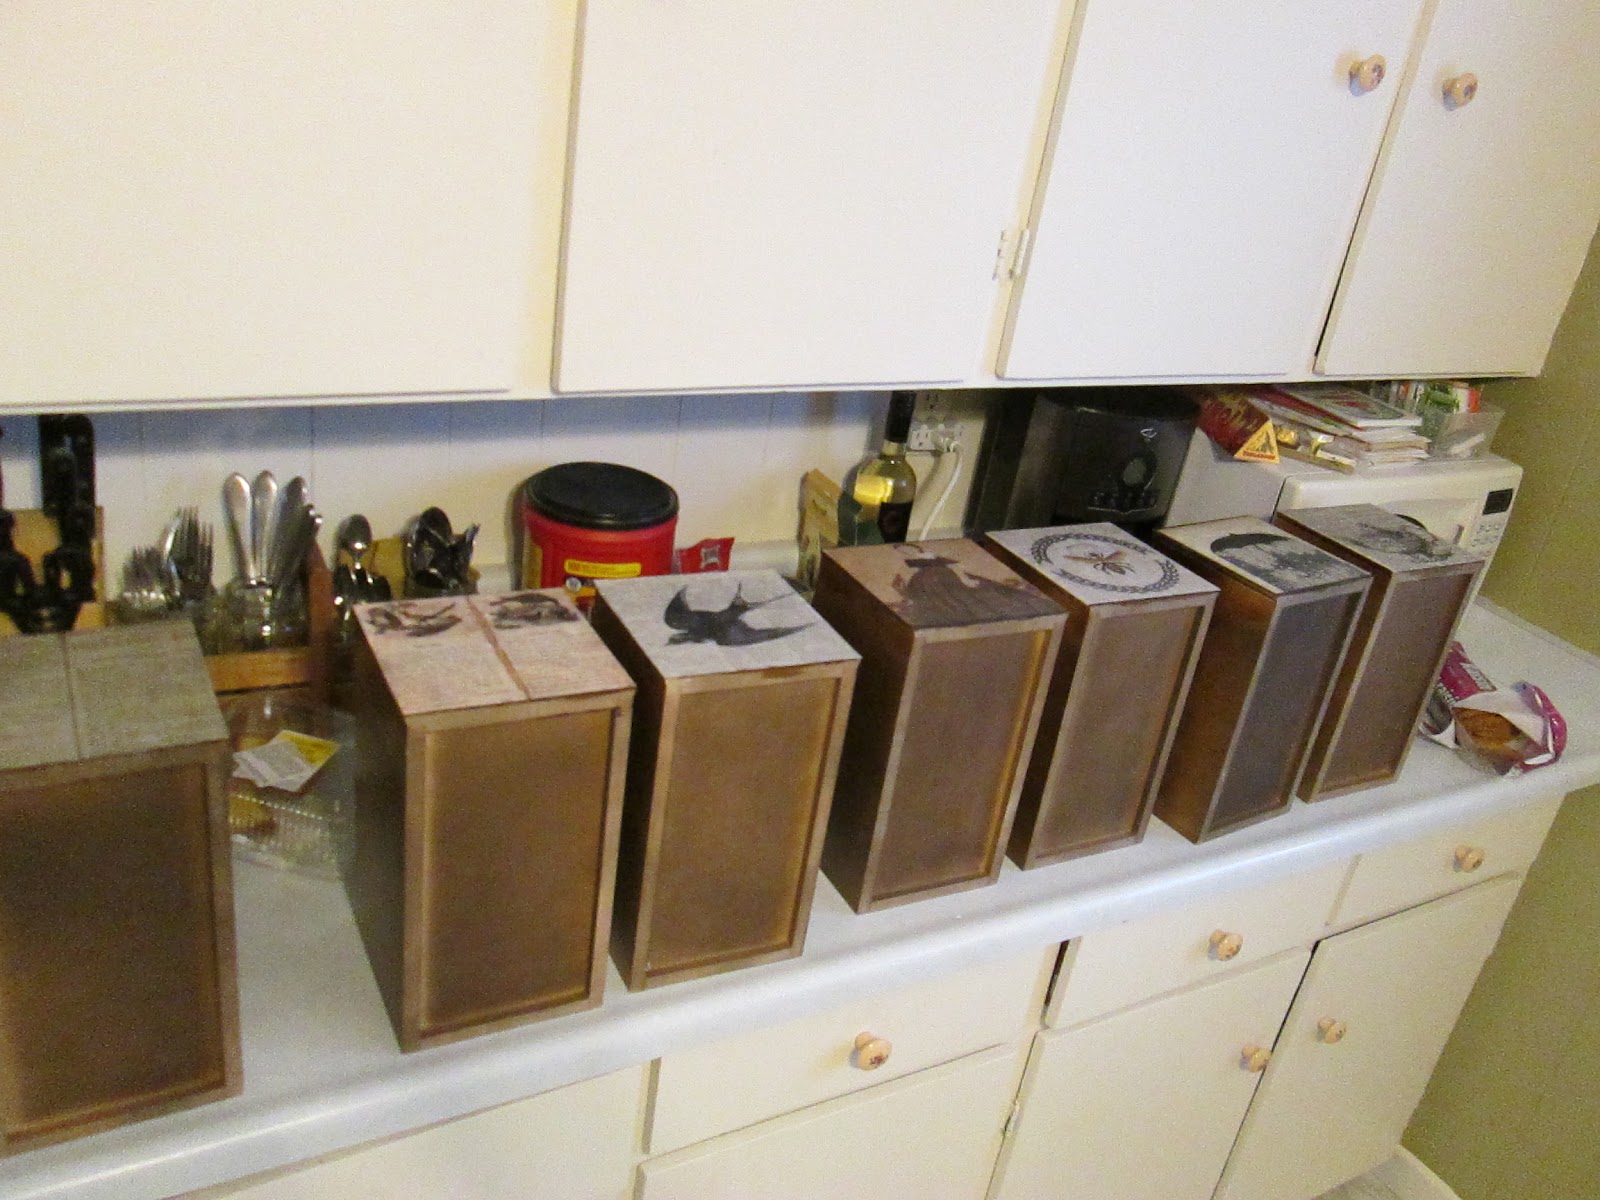
2. Removed the drawers. They actually held Cd's so I peeled those out with a butter knife. 

3. I printed out some old looking images that I liked, and cut them to the same size as the front of the drawers.

4. I lined up my drawers on my kitchen counter

5. I made a paper mache mix (flour, water,salt) and coated the drawer fronts with a layer to give a slight texture

6. I paper mached the images with 3 coats of the mix allowing it to dry between coats. 

(Olive helped...not)

7. I placed the drawers back in the the stand and Voila!
I still need to touch up the chipped corners, maybe with a bit of brown paint just to disguise it a bit. I plan on removing the legs and placing just the drawer section on top of my crafting table as I will be using it for my crafting notions.


Monday, January 7, 2013

Bad family photos and barking in the rain.

Okay so I missed a greater number of weeks than I would normally between posts. It's been a busy couple of weeks though, with Christmas, New Years, family outings, winter illnesses, basement renos and what not. All of these are poor reasons for not blogging though, I must confess that. They're not even really reasons...more just excuses.  so here's a bit of an update on most of what I have been busy with.

1. Creating another awful Christmas card. Last year we decided to start a tradition of sending out horribly distasteful Christmas cards. This year's is pretty bad: 

2. The Christmas tree went up. The Christmas tree came back down.


3. Working on our basement. I'm not going to post any pictures of that in this post though. I will blog about that when it's complete, but so far we have a great storage room, and the new laundry/bathroom facility down there. 

4. I found this great drawer unit for $8. I plan on covering each drawer with either printed book pages, or vintage floral paper. Then I will use it in my near future crafting corner which will be in our new basement. I will post the finished results probably not too long from now. 

5. I redid the front entrance way to our house by building in a built-in coat/boot/seat area: 


6. I made Olive a raincoat. I made it out of part of a shower curtain. Our new shower stall in our new bathroom, is only half as wide as the curtain, so I cut the curtain and reused the other half to make this new coat for Olive. I tried to find some patterns online but I didn't really like any of them, so I started measuring my dog and ended up creating my own pattern. 


Olive hated having to be measured every 5 minutes. As soon as she saw me with the partially completed coat, she'd make a dash to the basement or under a chair. But eventually it was completed.. Here is the final result:


Wednesday, November 14, 2012

Turtle Necks Are Still Cool Right?


I love shopping. I Also love saving money and sometimes the two seem difficult to mix. This is why I love thrift stores. You are doing yourself and the world a big favour by shopping thrift. First of all, you save a tonne of money, second, you are reusing instead of throwing out and item, and third, Almost every thrift store  uses some or all of the money to give back to a community. 

At least once per week before I leave my work, I browse through the dresses. I love dresses. And brooches. I don't love every dress, but if it is knee length, a-line, and has a great neck line and has some sort of shape to it, I'll love it.

So today as I browsed through the dresses, I found this interesting brown plaid dress. It looked wearable on the hanger, but it did look a little out dated. So I took it with me to the change rooms. I've had some luck with out dated looking dresses in the past. 
Anyways I tried it on. sleeves were a bit tight but as Stacy and Clinton  from TLC's What Not To Wear, you can always tailor an outfit to make it fit to your body. 
I also had to resew the hem just to make it a little sturdier as it looked hand stitched...but loosely hand-stitched
It may need a second layer of fabric in the skirt since it might be slightly see-through...not too sure about that yet. 
The dress is made by designer Jonathan Logan. I had no idea who this was, but then I looked him up and I still didn't know who he was but his dresses are all really beautiful! I do know now that J.L was a company formed in the 1940's and designed classy dresses geared towards young ladies.   Also if you look up his dresses on ebay, they sell anywhere between $150 and $250 these days.
I paid: $4.00. Sweet. 
My Jonathan Logan dress. 


I also made some other purchases somewhat recently. 

I bought this great turtle neck. Those are still cool right?  I think this one belonged to a very hip grandma. I only assume that because someone had sewn in shoulder pads and I don't think those have made a definite come back yet. So I removed them...but I will hold on to them in case that style does return, that way I can claim that I had them long before anyone else. 
granny's turtle neck.
cost: $ 4.00. Not bad. 

And then I purchased, this AMAZING sweater dress thing. It's by tna, and its a mix of a bunch of different wools. Plus it has that great big collar on it and it's super warm because of all the sheep and llamas that donated their wool to make it. . 
my warm sweater dress.
Cost: $4.50 Steal.  Original retail price: $180. Yup...I got a good bargain here. 


I don't really like knick knacks, but I love this little teal bird.
cost: $1

Sunday, November 4, 2012

DIY Beauty


This is a very quick post. Something that I just HAVE to share with people. I don't take credit for this as I found it online about a year ago so I give credit to whoever/whomever discovered this.  This is mostly for girls, but my husband does it too, and I totally recommend it for guys too.

You know those Biore strips you buy at the drug store or the beauty section of your local grocery store? You know how they cost and arm and a leg to buy but you really want beautiful pores and so you would willingly sacrifice that limb...sometimes?

Well I'm going to share with you a VERY cheap solution that allows you to keep all limbs.

Buy one box, or two or one million, whatever your heart desires of Knox Gelatin, (Or whatever brand, but this seems to be a fairly basic and popular brand)


Here are the steps to follow:
  • Mix 1 tbsp of gelatin with 1 1/2 tbsp of milk. (you can use any type of milk...but I would stick to the basics; skim, 1%, 2%, whole. Try to avoid butter milk or chocolate milk you can try it if you'd like though but don't say I told you to do that.  
  • Stir it so that it's kinda thick and then microwave it for 10 seconds...no more than 15 seconds.
  • Now put it on your face, not too thin. I recommend NOT putting it on sensitive areas like around the eyes, and I would also avoid areas that have very fine hairs...it hurts to pull it off afterwords and you don't want to damage the sensitive skin around your eyes. I usually just apply it on my cheeks, nose and T-zone
  • Let it dry. This takes about 15 minutes. When it is dry your face will feel really tight. Have someone tell you something funny. If you can only laugh on the inside and not on the outside...then it's dry. 
  • Start peeling. take a look at the strips of gelatin you pull off ( you can wash off the tiny bits that get stuck since water just turns it back into squishy gelatin). You will see a forest of pore stuff. Gross. 
  • Never buy the expensive stuff again.
You will also have bought enough to do this over and over again...and how much did you spend? Maybe $3 or so.