Wednesday, November 14, 2012

Turtle Necks Are Still Cool Right?


I love shopping. I Also love saving money and sometimes the two seem difficult to mix. This is why I love thrift stores. You are doing yourself and the world a big favour by shopping thrift. First of all, you save a tonne of money, second, you are reusing instead of throwing out and item, and third, Almost every thrift store  uses some or all of the money to give back to a community. 

At least once per week before I leave my work, I browse through the dresses. I love dresses. And brooches. I don't love every dress, but if it is knee length, a-line, and has a great neck line and has some sort of shape to it, I'll love it.

So today as I browsed through the dresses, I found this interesting brown plaid dress. It looked wearable on the hanger, but it did look a little out dated. So I took it with me to the change rooms. I've had some luck with out dated looking dresses in the past. 
Anyways I tried it on. sleeves were a bit tight but as Stacy and Clinton  from TLC's What Not To Wear, you can always tailor an outfit to make it fit to your body. 
I also had to resew the hem just to make it a little sturdier as it looked hand stitched...but loosely hand-stitched
It may need a second layer of fabric in the skirt since it might be slightly see-through...not too sure about that yet. 
The dress is made by designer Jonathan Logan. I had no idea who this was, but then I looked him up and I still didn't know who he was but his dresses are all really beautiful! I do know now that J.L was a company formed in the 1940's and designed classy dresses geared towards young ladies.   Also if you look up his dresses on ebay, they sell anywhere between $150 and $250 these days.
I paid: $4.00. Sweet. 
My Jonathan Logan dress. 


I also made some other purchases somewhat recently. 

I bought this great turtle neck. Those are still cool right?  I think this one belonged to a very hip grandma. I only assume that because someone had sewn in shoulder pads and I don't think those have made a definite come back yet. So I removed them...but I will hold on to them in case that style does return, that way I can claim that I had them long before anyone else. 
granny's turtle neck.
cost: $ 4.00. Not bad. 

And then I purchased, this AMAZING sweater dress thing. It's by tna, and its a mix of a bunch of different wools. Plus it has that great big collar on it and it's super warm because of all the sheep and llamas that donated their wool to make it. . 
my warm sweater dress.
Cost: $4.50 Steal.  Original retail price: $180. Yup...I got a good bargain here. 


I don't really like knick knacks, but I love this little teal bird.
cost: $1

Sunday, November 4, 2012

DIY Beauty


This is a very quick post. Something that I just HAVE to share with people. I don't take credit for this as I found it online about a year ago so I give credit to whoever/whomever discovered this.  This is mostly for girls, but my husband does it too, and I totally recommend it for guys too.

You know those Biore strips you buy at the drug store or the beauty section of your local grocery store? You know how they cost and arm and a leg to buy but you really want beautiful pores and so you would willingly sacrifice that limb...sometimes?

Well I'm going to share with you a VERY cheap solution that allows you to keep all limbs.

Buy one box, or two or one million, whatever your heart desires of Knox Gelatin, (Or whatever brand, but this seems to be a fairly basic and popular brand)


Here are the steps to follow:
  • Mix 1 tbsp of gelatin with 1 1/2 tbsp of milk. (you can use any type of milk...but I would stick to the basics; skim, 1%, 2%, whole. Try to avoid butter milk or chocolate milk you can try it if you'd like though but don't say I told you to do that.  
  • Stir it so that it's kinda thick and then microwave it for 10 seconds...no more than 15 seconds.
  • Now put it on your face, not too thin. I recommend NOT putting it on sensitive areas like around the eyes, and I would also avoid areas that have very fine hairs...it hurts to pull it off afterwords and you don't want to damage the sensitive skin around your eyes. I usually just apply it on my cheeks, nose and T-zone
  • Let it dry. This takes about 15 minutes. When it is dry your face will feel really tight. Have someone tell you something funny. If you can only laugh on the inside and not on the outside...then it's dry. 
  • Start peeling. take a look at the strips of gelatin you pull off ( you can wash off the tiny bits that get stuck since water just turns it back into squishy gelatin). You will see a forest of pore stuff. Gross. 
  • Never buy the expensive stuff again.
You will also have bought enough to do this over and over again...and how much did you spend? Maybe $3 or so.

Monday, October 15, 2012

Don't throw that out!


I'm stuck at home with a gross cold, surrounded by blankets, a hundred used Kleenex' and a sleeping dog. So why not use this time to write another post about penny pinching.

So as I have recently mentioned, we are renovating our basement. We removed our staircase  which used to be an L shaped one, and replaced it with a new straight staircase. The wood form the old staircase was very solid and I really wanted to do something with it so we made night stands from it. They are currently rather tall compared to our bed, but the plan is to eventually make a bed frame that will heighten our bed to a more proportional height in comparison with our night stands.
I also made baskets for the night stands to hold small or personal items. I simply made a box out of cardboard, and them brought my handy glue gun ( a crafter's necessity) and lined the inside and out side with a printed fabric. In my case I used the same fabric that I used for the trim of the lamps that are on my nightstands...gotta coordinate!) I then added a ribbon trim to clean up the edges and a bow so that I have something the pull the box out of the shelf with...like a drawer handle.
I still plan on adding one more thing to the night stand, but I am not too sure if I will do this or not. The plan is to create a sort of hammock under the shelf, that will really act as a second shelf. This would solely be to add a little balance the shelf as I feel the bottom half is too empty. Unless one of my readers has another suggestion which I would be open to hearing/reading.

What else is new?
Olive, my dog, got into our Halloween chocolate. I know you are probably gasping at the thought of a dog eating chocolate, but no worries...she survived it. My house on the other hand was covered in doggy doo-doo and smeared chocolate...some of it I wasn't sure which was which. She also decided to eat this chocolate on the quilt that I am making and so there is chocolate stains on that as well.  One week later at my husbands birthday party ( a.k.a Fritzmas), she helped her self to an entire bag of dried jerky a.k.a biltong which my husband received as a gift. So Ollie had a fairly fulfilling week.

I feel like a lot of the things that come out of my mouth starts with the phrase " I saw this thing on Pinterest..."
so....

I saw this thing on Pinterest. A new way to use your fire place. Our house has a non-functional fire place. I.e. we would need a new pipe inside our chimney, and an insert, whether pellet, wood or gas we haven't decided what we would want in the future. But for now,as seen on Pinterest,  it's filled with candles. Tall candles, short candles, skinny and fat. For now we have been lighting the actual candles, but eventually we will fill the hollowed ( by means of burning) candles with electric tea light...just to give the effect of the candles burning. The look is very cozy, without the cost of gas or pellets or wood, and once the electric tea lights come into play, without the risk of fire.


To sum it all up: I'm sick, my dog is a pig, I like Pinterest for DIY ideas.

Wednesday, September 19, 2012

Busy Busy Busy Bee!

I'm learning how to can food this year. So far I have canned 7 small and 3 large jars of tomatoes and 2 large jars of pickles. I've also done the freezer bag method... I've got about 8 bags of frozen tomatoes, 6 bags of frozen beets and maybe another 8 bags of frozen beans. YUM!! And I still have another grocery bag full of tomatoes to can!
This is my first year doing this  so my recipes are very basic. so If you know of any great canning recipes send them my way...you can do so in the comment section below...I'd love to know what other's are canning!
I did not can that bottle of Amarula... If I knew how to do that...

I though canning would be more difficult but it's actually quite simple. I started off boiling my filled jars and then realized what the heck?! I have a pressure cooker! so I did a bunch in the pressure cooker which took a fraction of the time.
 Here's a funny situation that canning has gotten me into though: I decided that instead of canning in small jars, why don't I use the larger jars?  so I went out and bought a box of larger mason jars, cooked and peeled my tomatoes, and proceeded to place them into my pressure cooker... the jars were taller than my pressure cooker, ugh!
I had to go on a scavenger hunt throughout the city to find a large (and cheap) enough pot to  hold my jars and allow for a 2 inch cover of water. I finally found a canner in Walmart, the only one left.

I have also been doing some gardening. The soil in my area is the most amazing soil ever...it literally feels like potting soil so adding gardens is so easy to do. I don't know if I changed the gardens too much since my last post, but today I expanded the garden along the fence line. The way it was designed was soo......blaah. it looked like a narrow gutter running along the fence. I prefer to have some dimension to my gardens so I I made it deeper, and added some flow to the edge. Next year I hope to get more of a variety of perennials


Thrift finds:

 This brooch I found at a flea market. The owner said it belonged to her husbands mother...or was it grandmother..I'm pretty sure it was grandmother. Anyways, none of her kids wanted it...so I bought it for a twoonie! I love it! I think I'm going to become a brooch kind of girl


Add caption


This is a great mixing bowl complete with handle and pouring spout. great colour too!              


Sneak Peak Crafty stuff:

My dog keeps chewing up my pin cushion. I always come home to see that my cocker spaniel has become a pin cushion spaniel and I have to spend some time pulling pins out of her long furry ears. So I made myself a pin cushion and gave Olive the Blue pumpkin tomato thing that used to hold my pins. It also hold my measuring tape and other small notions.
FUN!


Here is a sneak peak at my quilt: 
Far from finished. 


Friday, August 24, 2012

Barn Raising At Cottage Corners.


So it has definitely been a while since my last post. Too long of a while if you ask me. Maybe some of you are thinking "gosh... finally a break from her blogging posts appearing on Facebook". Tough. Here's another one.
We've been in our new home now for almost 3 months now. When we first moved in we said we would give it a couple months, at least until the fall, before we begin to do renos. Well... that sure didn't happen. My fingers itched with the need to change things beyond a coat of paint.
 We did some landscaping, adding a couple gardens,enhancing the ones already present, cleared walkways and paths, added some cedars. 
I decided that we needed a better garden shed. The one that we had was one of those basic metal ones, you know with the rusty roof and sliding doors that don't really slide but just scrape along a hinged edge? I wanted a rustic little garden shed. And so I started planning, designing, calculating costs etc. I thought I could build a really cheap little shed, like the ones I've seen on Pinterest. Let's just say my calculations were WAY off and the shed had some "unexpected" costs. I know that it could have been built a lot cheaper since we used a lot of new lumber, when we could have searched more for the used stuff. 
While my husband and father were building the shed, I started some separate projects. Of course I cannot do one project at a time, I have to do them all at once. 
I started to paint the exterior window frames from a nasty old faded brown to a clean crisp white ( I still have a couple windows to do but they are obstructed by either excessive height...or bees). I also started making shutters for my windows. I thought a bout buying them....but what a rip off! I just made shutters for about $10 a pair. I've only completed the shutters for the large front window for now. I also painted my front and back door a beautiful red. ($5/can at Liquidation World!). Of course in the midst of these projects I also started a quilt. But I will blog about that when it's done. 

The shed was completed just a couple of days ago I added a couple coats of "weathered barn wood" stain and a dry brush applique with white to the frames. I attached my solar lanterns that fade on and off ( rather that rapid flashes). My mother helped me add some gardens with a nice stone border as well as a couple new gardens around the back yard
Then as I was biking to work this past Wednesday, I saw that one of my neighbours had tossed out a wooden bench. I quickly called the hubby ( I don't know about the legality of cellphone use and cycling) and he picked it up. I sanded it after work and placed it by the new shed.

We have now started renovating the basement. The idea is to make it look like a beach house, inspired by our friends' guest cottage. So far the basement has been gutted and a new staircase is in place.

Side story:
While working on the front gardens, we heard what sounded like a motorcycle and when we turned around this really old toothless man drove by on a motorized bicycle, wearing aviator goggles and a hat. He looked so serious! Have you ever seen the movie Waking Ned Divine? well this seemed like a very similar scene out of that movie:
He looked just like this but with clothes, no teeth and
a hat instead of a helmet

Monday, July 23, 2012

And then there was (a pretty) light.


Our guest bedroom had not bedside lamps. This is not the end of the world, nor anything close to it. However, should my guests need to get up in the middle of the night, it would be nice/convenient to be able to turn on a bedside light instead of stumbling through the room and turning on the main light, especially if there might be a sleeping ( and wanting to stay asleep) spouse next them. 
I wanted to put our "old" bedside lamps with the guest bed, but that would have left us lampless, and I didn't want to pay an arm and a leg for decent looking lamps. Now I know I'm sure many people have had this idea, and have done this re-make, but I thought I will share it either way. Anyways, it's my blog, I can share what I want. 
So I bought these two very shiny faux gold lamp stands (shades not included) at Value Village (aka Savers for those in the States). I really dislike extremely glossy things and I dislike gold lamp stands. But I liked the shape and the fact that they were matching and the fact that I got both for a total of $9. 
Keep in mind, for this type of project, the lamp stands don't need to be the same shape, they should looks similar and be of similar height, but I think if they were slightly different, that would give it a really cool character! I also picked up two lampshades for 6 dollars (though I could have gotten them for $4 but that's another storey)
I went to Home Depot and bought a can of spray paint in anodized bronze, which is this amazing flat purple-bronzey-grey. I applied several coats to the base and set those out to dry. I then created  ribbon out of some leftover fabric by folding a strip into thirds, ironing it flat, sewing it and then hot gluing a strip at the top and bottom of each shade. 
I was thinking about attaching a fabric flower of two...but it was too much. sometimes simple is just better. Now all I need are night stands to replace the stools that my beautiful lamps are standing on. that will have to be another project. 


Sunday, July 15, 2012

Beauty doesn't have to hurt all the time....


Our new house has a very tiny bathroom. That is something that I definitely miss about our old house...the immaculate floor to ceiling ceramic bathroom with a deep bathtub and room for all my girly beauty products and other junk. 
Our new place has a very tiny vanity with wee little drawers and only enough space under the sink for the pipes. And our bathtub...well it's no more than a foot tub. 
So I decided to start looking around for a small beauty vanity to put up in our loft bedroom. That way I can keep all my hair and makeup products and accessories out of the bathroom . 
The real things are quite expensive and fancy looking tables cost a lot even used. So I searched good old Kijiji for a desk or a table or something that can be converted into the very thing I needed. Now silly me forgot to take the before picture and my husband is slightly irritated with me for forgetting that ( he made sure I would tell everyone about that)  so I found this picture of a desk that looked very similar to the "before" desk:
basically the legs and knobs are different but everything else is pretty much the same. You get the point. 

Funny side story. I bought this item from a young woman no older than myself. ( I always need to remind my self to write woman and not girl) and she gave me her address which is 10 minutes from my place. and about half way to the town I turn on the GPS to help me get to the exact location and surprise surprise the GPS does not recognize the street. Good thing I'm a woman and willing to ask for directions! I go to a chocolate shop and ask the young girls where this street is and neither of them have ever heard of it. Now having the fairly intelligent mind that I have, I ask the girl if there are any new subdivisions built in the town and low and behold there was and after some extra phone calls and guidance from home, we found the new subdivision and the street. 

So I took the desk home, painted it antique white, did some sanding and what not, spray painted the handles black and voila: I have a beauty hutch/vanity thing
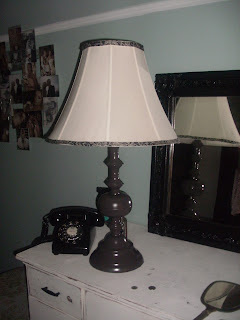
Of course I accessorized it too: mirror ( refinished to a glossy black), old rotary phone, hand held mirror and a black storage ottoman with fancy feet, all found at the same flea market, an old soap dish for some bobby pins, rings, etc., my mannequin refurbished (see post from the past) and a lamp...probably from Walmart but I will most likely replace it with something else seeing that this lamp belongs beside my bedside
Now I just need to make a little spot for some necklaces and earrings and such. but that will have to be another project. 

Friday, June 22, 2012

Eat In, Take Out.

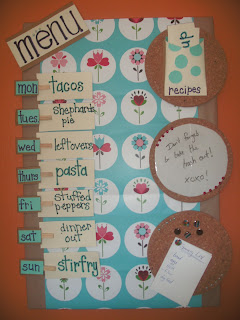
I finally had a week where I could once again meet with a group of girls for crafting. This week we dicided on making menu boards.
I discovered one while browsing on Pinterest, and decided that I need something like that. I attempted a similar idea once but it merely consisted of pinning magnets to my refrigerator to hold up some recipes. 
The menu board idea howver, is way classier, and adds a splash of colour to the kitchen. ( although this splash of colour is hanging over another splash of colour in my kitchen) 

There are are many ways of going about making a menu board but here is my approach. 
1.I first fastened together two canvases bought at the dollar store using a fine wire. ( this was because I could not find a larger canvas for a little money. 
2. Next I covered the canvas in parchment paper paper and then laid down a strip of pretty paper. this happened to come from a gift bag that I liked)
3. I then added cloths-pins to hold the menu cards which display the meal on the front and the ingredients needed on the back. 
4. I then added three cork pot holders. the top one holds the recipe box for extra recipes, the middle one a whiteboard and the bottom one a cork board to pin notes to to.
5. I added a "title" in the corner, some decals and voila, a menu board. 


Monday, June 18, 2012

A House, a Job and a Sweet Ride


my new sweet ride. 
So it has been 3 weeks now since we have moved into our new house and it has certainly been a busy three weeks!
I had to give up most of my students and now I have to start my tutoring business anew, which is a little bit frustrating as I cannot advertise through the hospital as easily. I have been busy creating a website and making flyers and researching places to advertise. It's a little slow-going so far.


I have been asked a couple of times now why on earth I would move to Brantford as if it;s the most awful place to ever live. And Sure MacLeans tries to ruin cities like Brantford every so often by producing scary and skewed stats about cities but I think many people dislike their hometown just for the sake of disliking it. But, Brantford seems very nice so far. The people that I have met so far are almost overwhelmingly friendly that it almost scares me. My job is only a ten minute bike ride away on my sweet new ride...see pic above. and we have the fantastic Grand River 5 minutes away and the lovely town of Paris  only a ten minute drive. 

 I was able to to take a week and a half off work between my transfer from the flamborough Value village to the Brantford location, which has been a big help. I had an entire week to move things in, organize ( not quite finished) and paint ( also not finished...but over time)
I have finished painting the kitchen which in my opinion when moving into a new ( but slightly older home) is one of the first room that needs to be changed/updated to match your style since it is a room that is used quite often.

here are some before and after of the kitchen:


Friday, May 11, 2012

hey that was fun!


Once per week the men get together for their Bible study and the women and friends get together for their little social gathering. While the men tackle to book of Matthew, the women tackle personal stories, cheese platters and a good game of Six Degrees of Wikipedia. This week we changed it up a little and decided to make it a craft/DIY night. I got this notification about 5 hours before our meeting, and because I don't usually make what I'm going to label as small tool crafts, I had a difficult time coming up with something that didn't require my sander, staple gun, sewing machine, table saw or a can of spray paint.

So I started to research  for a craft on the internet for a small tool craft and found something on a very reliable site many of us know as Pinterest. I have been so addicted to this site lately. There are sooo many fabulous ideas there. So I found this fabulous wreath made by a lady named Myra who is a wonderful Christian lady  whose blog I happened to just stumble upon and who does amazing DIY thrifty things.  You should read her blog

this was the wreathe she made :


I used her's as inspiration to make mine:


I think it turned out pretty good for my first wreath. 
I didn't have burlap so I used an old tweed skirt that I bought at Value Village to make the base, then I wrapped yarn around a bout 1/3 of it and added some fabric flowers, beads, buttons and feathers. Voila!


Also side story. 
(Fritz actually wanted me to post this in my blog. he said, "make sure you mention this in your blog" on our way home from Bible study.)
Do you remember, when watching Rugby, and whenever the game was starting or a goal was made (I can't exactly remember the occurrence) this Spanish sounding trumpet tune would play. So Fritz made that little tune his ring tone for his texts.
Last night He was standing by the coffee table and picked up a shoe horn that happened to be present and proceeded to play it like a trumpet. An right on cue, he got a text and his trumpet song played as he was pretending to play the trumpet on the shoe horn. We all had a good laugh.

Tuesday, May 8, 2012

High/Low vs Louw

First off, I have an awesome new name for these types of blog entries. They used to be just called High vs Low vs Lowest, but then after my second post my friends, the Tuckey's told me I should call it this instead which I thought was genius because that really is what it is. 
So I saw the latest issue of Style At Home which is one of my favourite magazines especially now that I am preparing to move. Anyways I noticed that it had another High vs Low budget room design articles which is something up my alley 
Now I don't know if this room is from the latest issue, but I do believe it is from a very recent issue


HIGH
Here is the High Cost room and the items along with their prices:


price: $15,787
SOFA  $4,495,
 END TABLE, $695,
 COFFEE TABLE, $949,
CABINET, $2,245,
RUG , 8' x 10', $3,248, 
THROW in Cream, $295, 
TOSS CUSHION, 20" x 20", $345,
TOSS CUSHION in Saffron, 18" x 18", $637, 
BOX, $125,
TABLE LAMP with taupe shade, $600, 
 DECORATIVE BALLS, 4", $7 each, 
DECORATIVE BALLS, 2", $9 each,
 BOWL, $275 (large)
 BOWL, $75,
 DRAPERY PANEL with Perfect Pleat, $660 per panel,
CUSTOM FRAMING, $525 each, Pi Fine Art.

LOW:
Here is the Low cost room, the items along with their prices:
price $6,326


SOFA in Coal, $1,799,
 END TABLE, $239
 COFFEE TABLE, $399,
 CABINET, $600,
 RUG in White, 8' x 10', $1,995,
 THROW in White, $59
TOSS CUSHION, 18.5" x 18.5", $79,
 TOSS CUSHION in Grey/Gold, 20" x 20", $135
BOX in Natural, $19 (small),
 TABLE LAMP with taupe cylinder shade, $210
DECORATIVE BALLS, 3", $3 each,
 BOWL, $75 (large)
 BOWL, $22
 DRAPERY PANEL in White, $190 per panel
CUSTOM FRAMING, $239 each, Pi Fine Art.


LOUW

Here is the" Louw cost room's items
(again, the room is not set up but the items listed above are also listed below. The items may not match exactly or even as closely as the comparison above, but will give the same feel/look to the room)
bowl  $3.50 (ikea)

bowl  $5 (ikea)

basket instead of a box $6  (ikea)

cabinet  40 (kijiji)
I would remove/replace knobs, off-centre

coffee table $20 (kijiji)

couch $250 (kijiji)

white curtains $40 (Ikea)

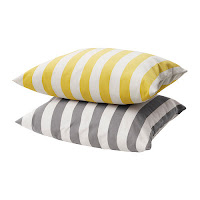
just the yellow cushion $16 (ikea)

cushion $14 (ikea)

end table $10 (kijiji)
paint this white...who doesn't have white
paint laying around the house?

Ribba frame from Ikea-35
you need 2...so $70

silver based lamp and shade  $10 (Kijiji)

White Rug 8X10 $50 (kijiji)

Throw $40 (ikea) 

(I did not include the silver decorative balls because the price in the LOW room is pretty basic, but I suggest buying some Christmas balls at your local thrift store or wherever and place those in the bowl)

My grand total
$574.50....let's just say $575.


So total differences:

High: $15,787
Low: $6,326
Louw: $575

Tuesday, May 1, 2012

It's Official

    We have officially sold our house. Pretty much all the papers are signed. We sold our house through Comfree,  a fantastic private brokerage. They seem to be a relatively new thing, but my experience with them is absolutely fantastic!. Basically you pick from a number of advertising packages and they come and take pics of the house and set you up on their website, advertising for you. You do the rest. So once we had all that set up in only a matter of a couple hours, we were responsible for setting up appointments, doing open houses etc. The best part is that we don't have to pay commission to an agent. I'm sure an agent would have done a decent job but, in my "humble" opinion they don't have experience living in the house they are selling. They don't know all the details of the house or the neighbourhood, they buyers can never know the whole truth about the house before they choose to purchase. Where as with  Comfree , you are speaking to the people who live in the house, who know about the little details, the costs, the neighbourhood and what not.
    So my point here is that I totally recommend  Comfree . Their website is so easy to navigate through , much like a social network. You have total control of the sale of your house, and a bunch of people to help you out just a phone call away. And you save a whole bunch of money by not paying an agent. ( I'd say roughly $5000 for every $100 000 that your            house is selling for).
    We are pretty stoked to move into our new house at the end of this month. But we are also kind of sad to be leaving our first home. But now it is time to move on. I guess the feeling really are mixed about this change. I mean  we put a lot of work into it, and I have done many blog posts about the renos ad updates and yet at the same time, this is like a fresh start, a new house to decorate and many posts to write!
    I have spent so many hours on Pinterest, picking out ideas and colours  for our new house. One of the first things I plan on doing is repainting the cupboards in the kitchen. At the moment, they are a 1993 light blue...as in the colour my mom had in her kitchen in 1993. I will also need to paint the big bedroom downstairs because it is currently a soft lavender....a circa-1997-in-the-bathroom kind of purple. The tiny bedroom has a 1992 wallpaper on it which I don't despise as much as the '92 blue or the '97 lavender, but will eventually have to go.
   The basement for the most part is unfinished with the exception of the rec-room. the laundry facilities are in the basement too, but not in an enclosed room, which is something that I would like to change in the near future.
    And one of my favourite things that I am really looking forward to decorating is the mantle! I think I am going to hang my ugly horse painting above it but I won't really know until I get there.  Either way, I can't wait to start on the new house, doing all the decorating and landscaping! Oh and  I wan't a picket fence!!


Old house. It will be missed. 
New house. I hope to paint the brown trim black and add
some shutters and and a nice red door. And a picket fence!